Winterizing My Rabbits & Chickens + DIY Rolling Drop Curtain
I live in Northeastern Indiana, and our winters can get pretty cold. Since I own rabbits and chickens that live outdoors, my mission as a responsible livestock owner is to make sure their living conditions are ready to face the falling temperatures, snow, and especially the windchill. In this blog post I’ll explain how I covered my rabbit hutches in plastic sheeting and created a clear rolling drop curtain. I’ll also address the extra steps I took to ensure my chickens are ready for a comfortable and warm winter within their coop.
Winterizing the Rabbits
Rabbits in Cold Weather
As humans, sometimes we tend to think that if it’s too cold for us, it’s too cold for the rabbits. While empathy for our furry friends is an admirable trait to have, we must remind ourselves that this thought process isn’t logical. Most rabbits are cold-weather animals by nature and are most comfortable in temperatures ranging from 30-60°F. We must keep in mind that rabbits are constantly wearing a thick winter coat complete with fluffy gloves, boots, and a full face mask. A rabbit’s “normal” internal body temperature is around 102°F. It is much easier to keep rabbits in the cold winter months than during the hot summer days!
That being said, even with a winter coat on 24/7 there is such thing as too cold. A winter coat doesn’t do much to protect rabbits from wet conditions or windchill, which is the main point of concern when keeping rabbits outdoors in the winter.
Stapling Plastic Sheeting
On my Teal Stone Hutch build, I decided to forego plywood for the back and sides of my hutch and instead I left it open for maximum ventilation, as we were still going through some of those hot summer days (CLICK here to see how I built the Teal Stone Hutch). I personally find plywood heavy and unnecessary for the back and sides of the hutch - it blocks air flow and creates a darker atmosphere, which I find undesirable for keeping my rabbits healthy and happy. It also gets urinated on to the point of looking disgusting, and there’s not much you can do apart from repainting it every year. I, for one, didn’t want to deal with that anymore!
So because I left it open, many people asked how I was going to protect my rabbits from cold weather and snow. The answer is simple: Plastic sheeting, duck tape, and a staple gun. All of these supplies have their rightful place on my homestead.
After measuring the back and sides of my hutch, I cut plastic sheeting to size I needed. I find the 4mil plastic to be plenty heavy enough, but I probably wouldn’t go any lighter. I lined the sides of my plastic sheeting with duck tape for extra reinforcement, and staple it tightly into place on the back and sides of the hutch. There you have it - the back and sides of your hutch are now winterized for the rabbits. It’s that easy.


Rolling Plastic Drop Curtain for the Front
This is an idea that I rolled around in my head for several weeks before executing. On my previous rabbit hutch, I created a side-to-side sliding curtain using a curtain rod, plastic sheeting, duck tape, and zip-ties. Now this is certainly still a viable option. In fact, I almost created the same thing for my Teal Stone Hutch. But I just really liked the idea of a rolling drop curtain, so I decided to give it a go, and I have to say… I’m pretty happy with the results :)
What you’ll need:
Plastic sheeting
Duck tape
PVC pipe and pieces
Zip-ties
Glue that bonds to PVC
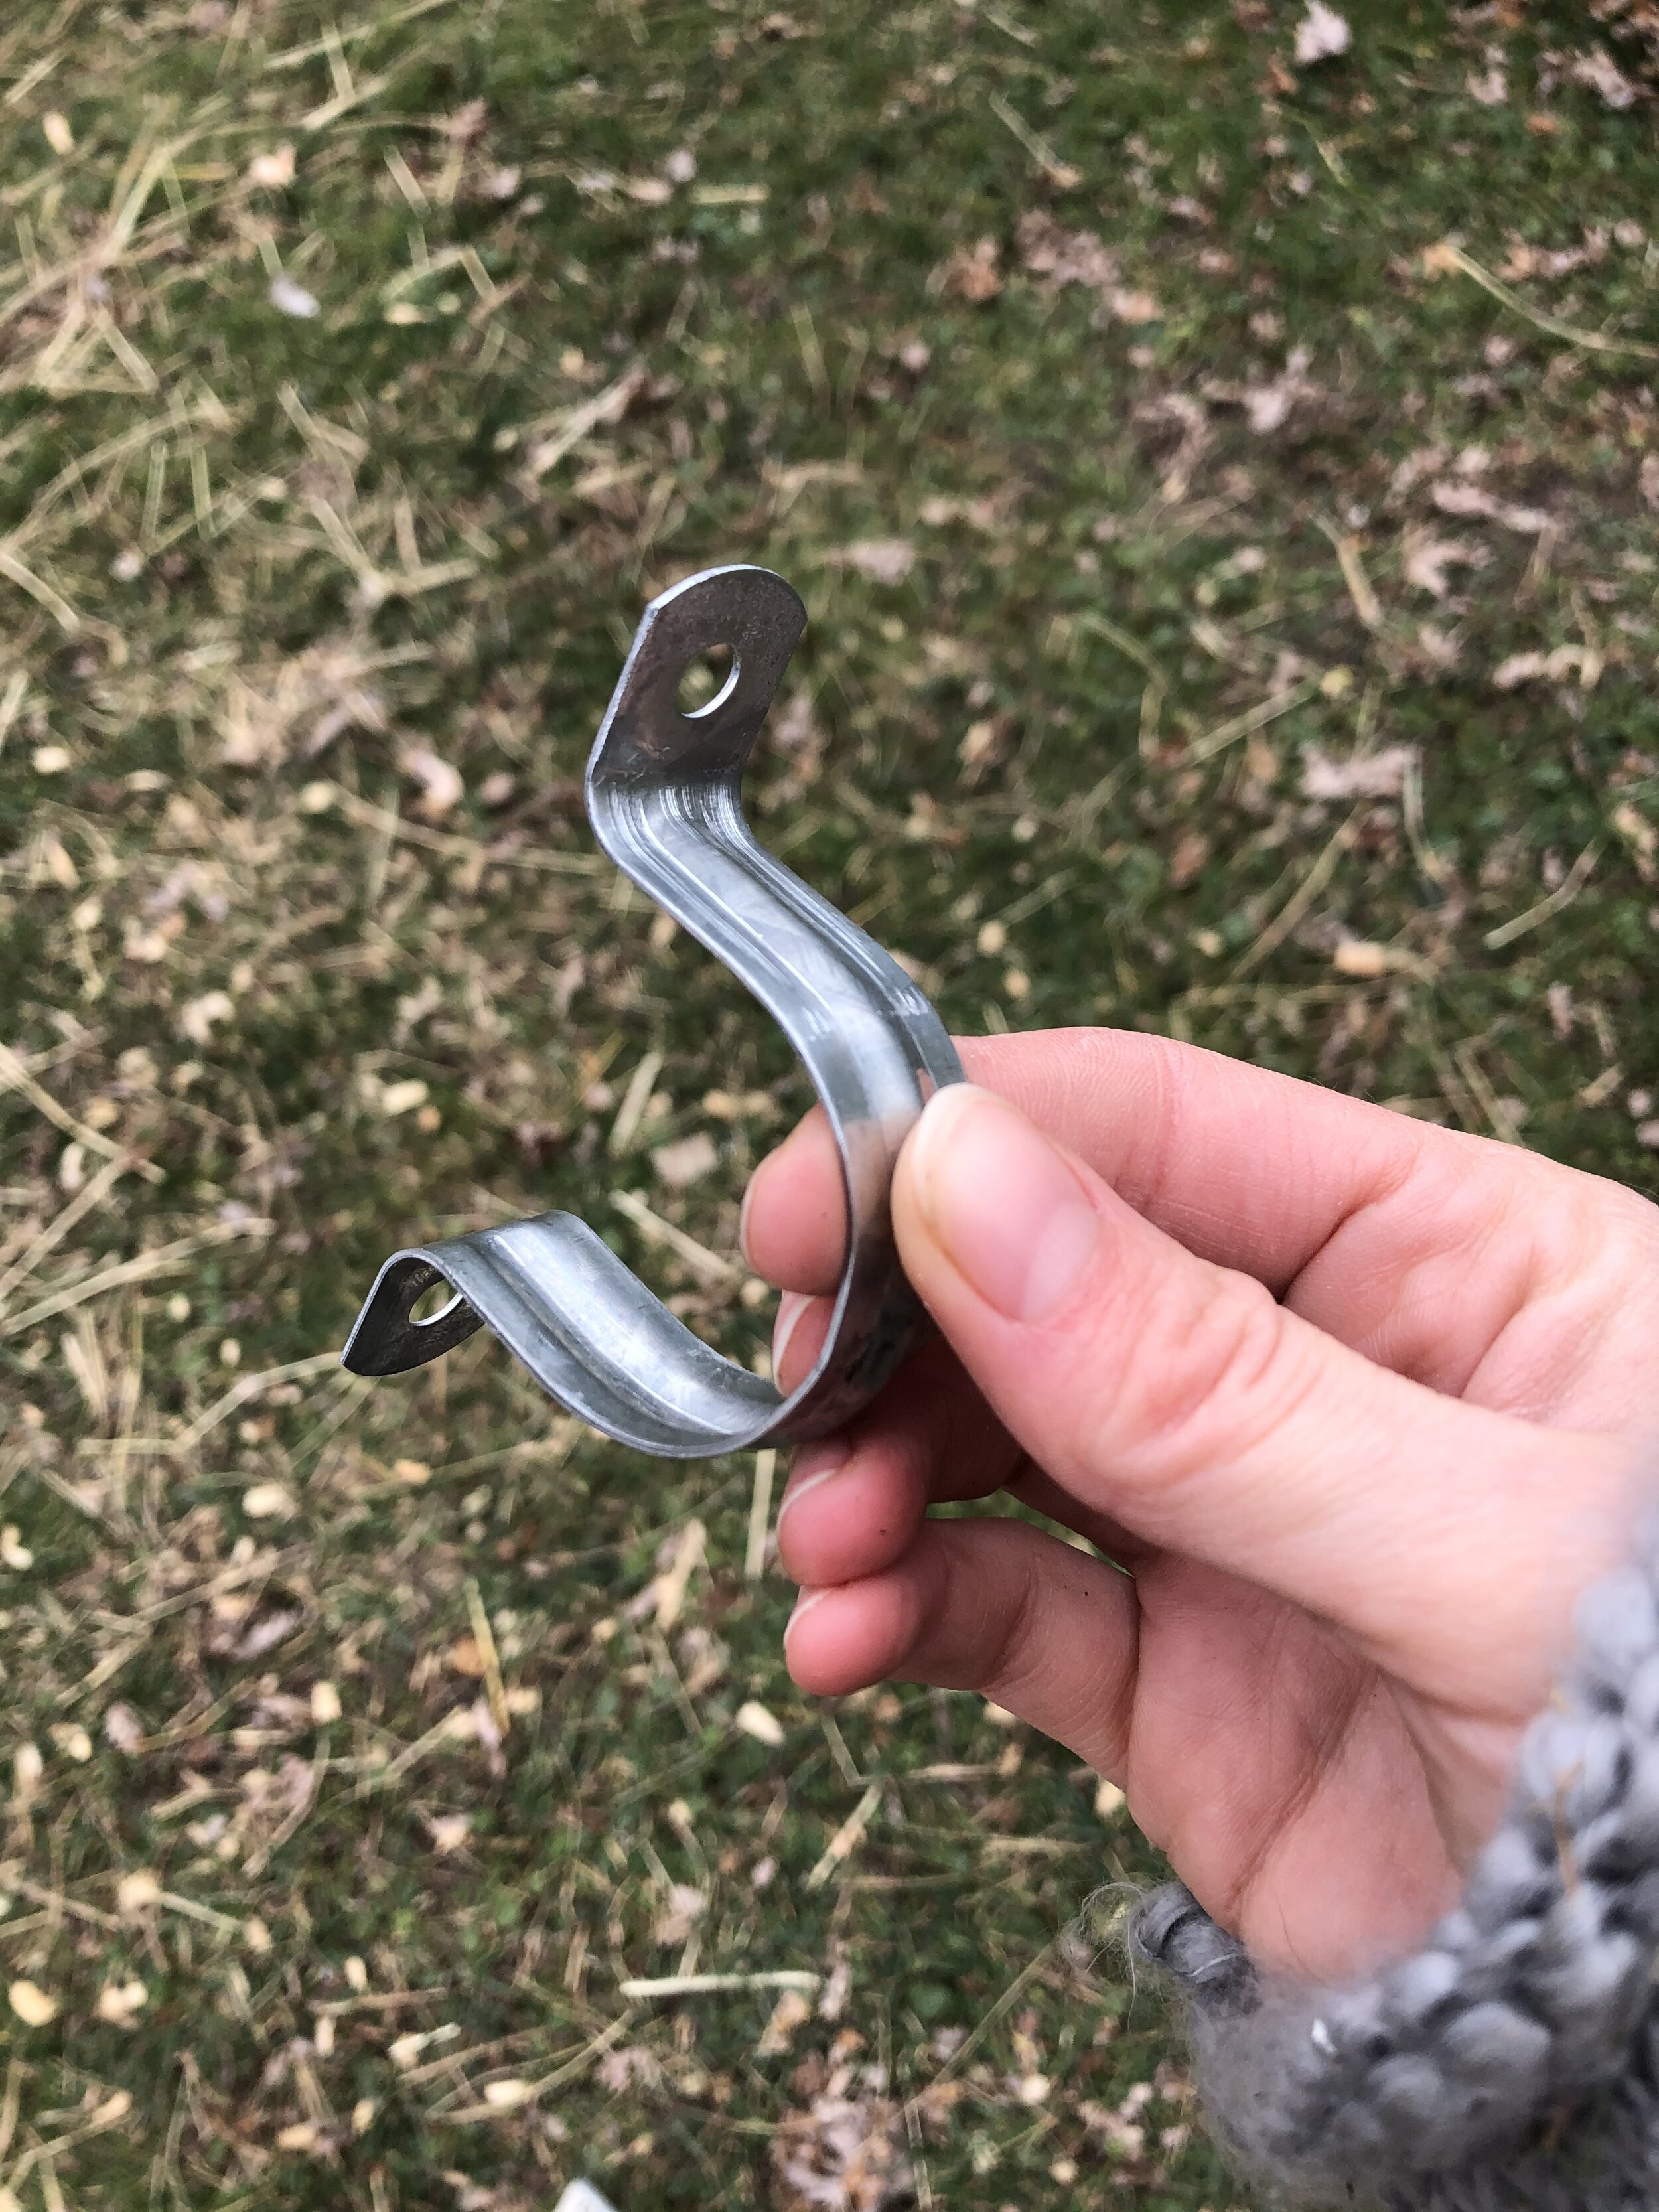
Galvanized tube straps
Screws & eyelets
Paracord (or other weather-resistant rope/cord)
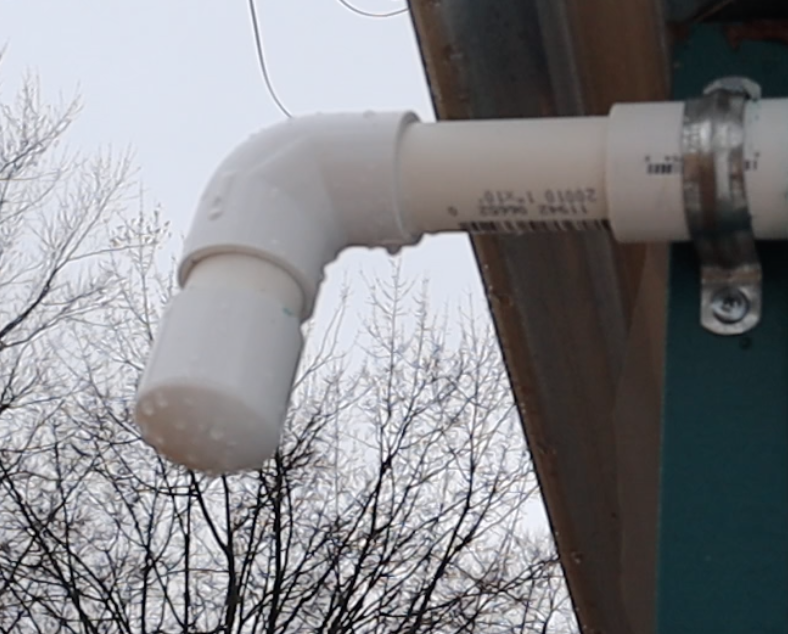
Step One: Attach the Tube Straps
I wanted my tube straps to be a bit bigger than necessary for ease of rolling the curtain up. I ended up going with 1” PVC pipes, so I chose 1 1/4” tube straps. On my big hutch, I attached a tube strap to both ends as well as one in the middle. On my smaller buck hutch, only two tube straps (one on either side) were necessary.

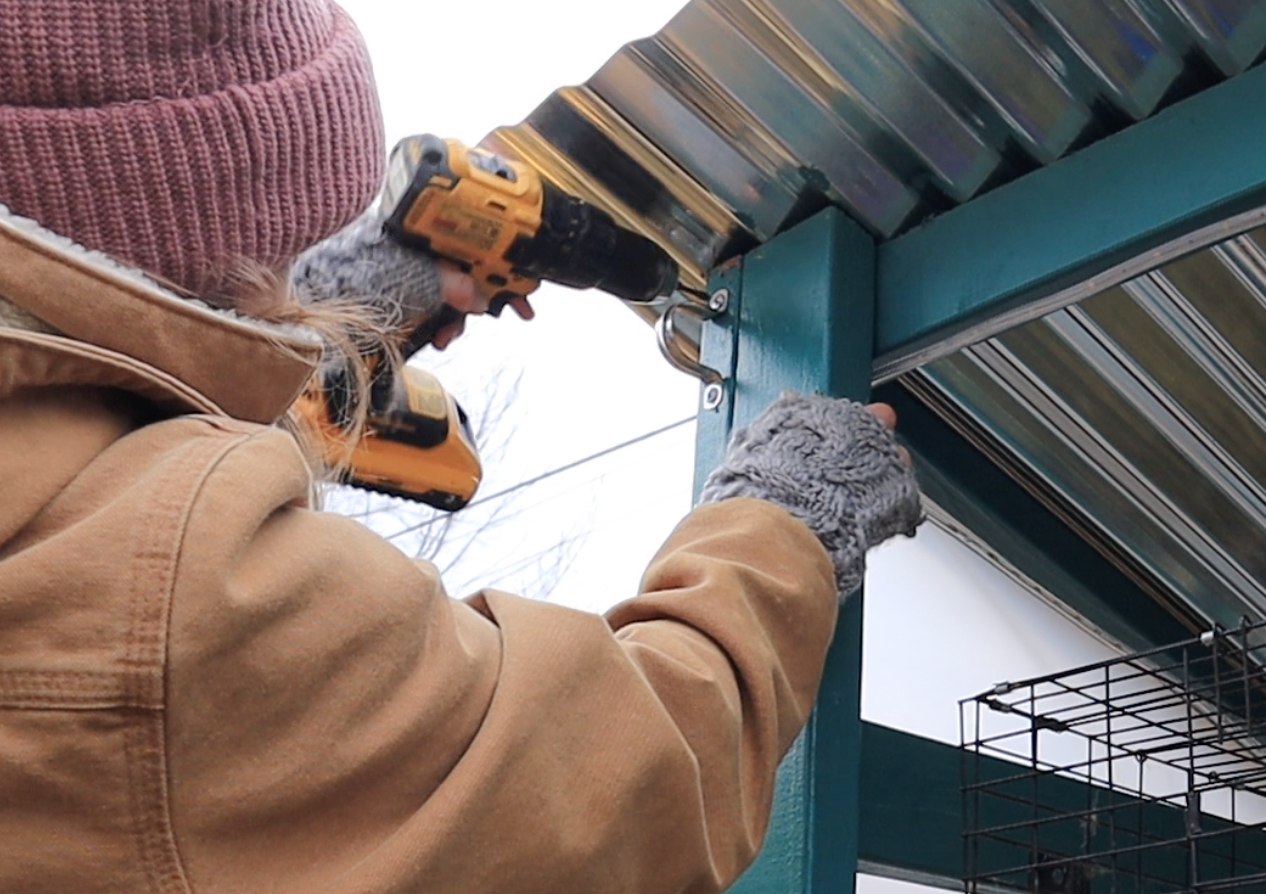
Step Two: Assemble the PCV “Curtain Rod”
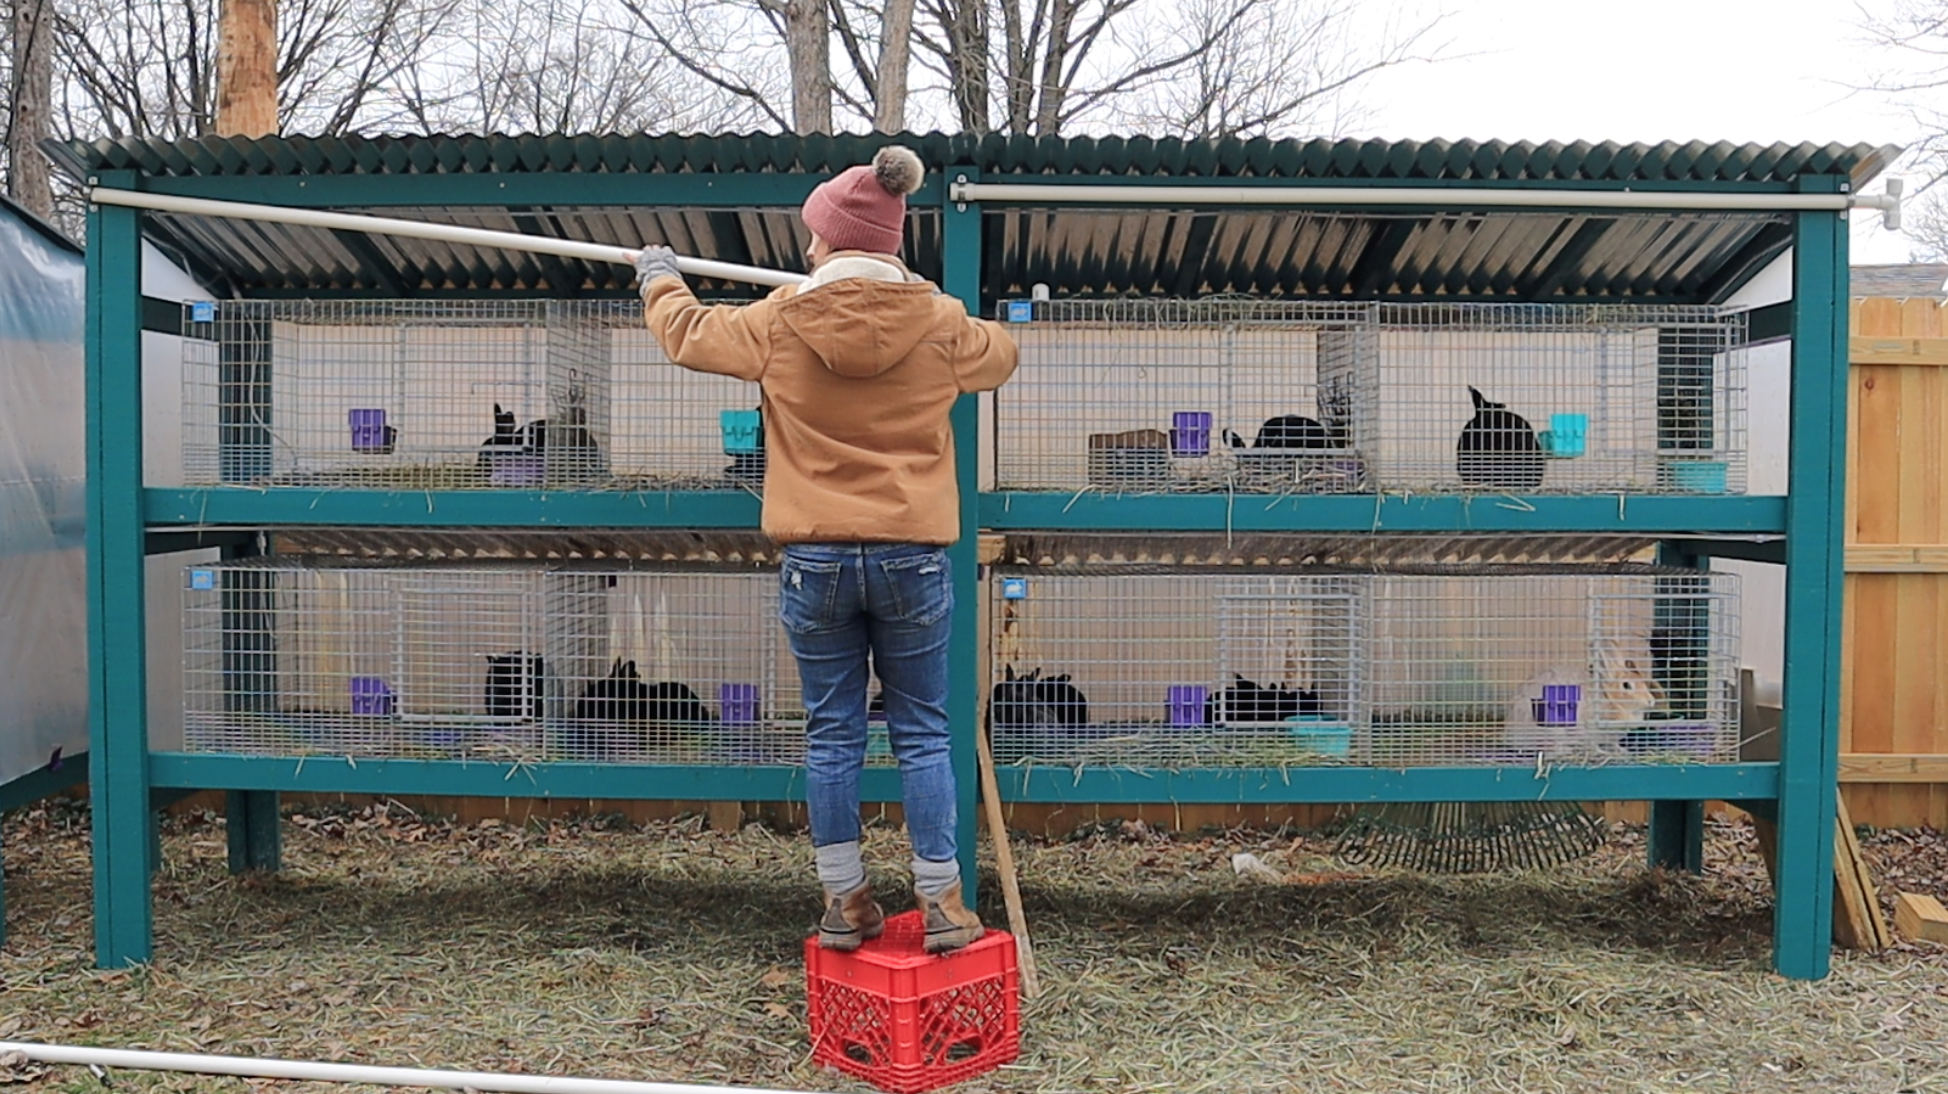
Because my big hutch is so long, I chose 1” PVC pipe for the top to act as the “curtain rod.” Then, I cut my PVC pipes to size, glued them together (via connecting/joining pieces), and slid them into place within the tub straps. On the end of the PVC curtain rod, I attached more pieces in the shape of a hand crank and made sure that the whole piece was secure and easy to roll around.
Step Three: Attach the Plastic Sheeting
Cut your plastic sheeting to the length desired, then duck tape the plastic sheeting to the PVC curtain rod.* It is important to use water-resistant duck tape since it will be exposed to the elements all winter long. I tried to keep my plastic sheeting at least 1” away from the tube strap to keep it from bunching when I rolled it up. Before going any further, I recommend rolling the plastic up to make sure everything is in place the way it should be. If everything rolls up smoothly, you’re ready for the next step.
*For extra reinforcement on the plastic sheeting attached to the curtain rod, cut small slits in the duck tape and plastic and zip-tie the plastic around the PVC in several different evenly-spaced locations. I learned to do this after mine was already assembled. It creates a more durable attachment.


Step Four: Attach the Bottom PVC Pipe
If we left the PVC curtain the way it is in the last step, your plastic would just blow around in the wind. So this step ensures that your plastic sheeting stays nice a straight at the bottom, and adds a bit of weight to keep it from flying around.
Cut your PVC to length for the bottom, adding several inches to each side (you’ll see why in the next step). Using duck tape and zip-ties, attach the plastic to the bottom PVC rod and secure it well. Again, you’ll want to test out the rolling function to make sure everything is still working smoothly. If it is, congrats - the hardest part is over :)


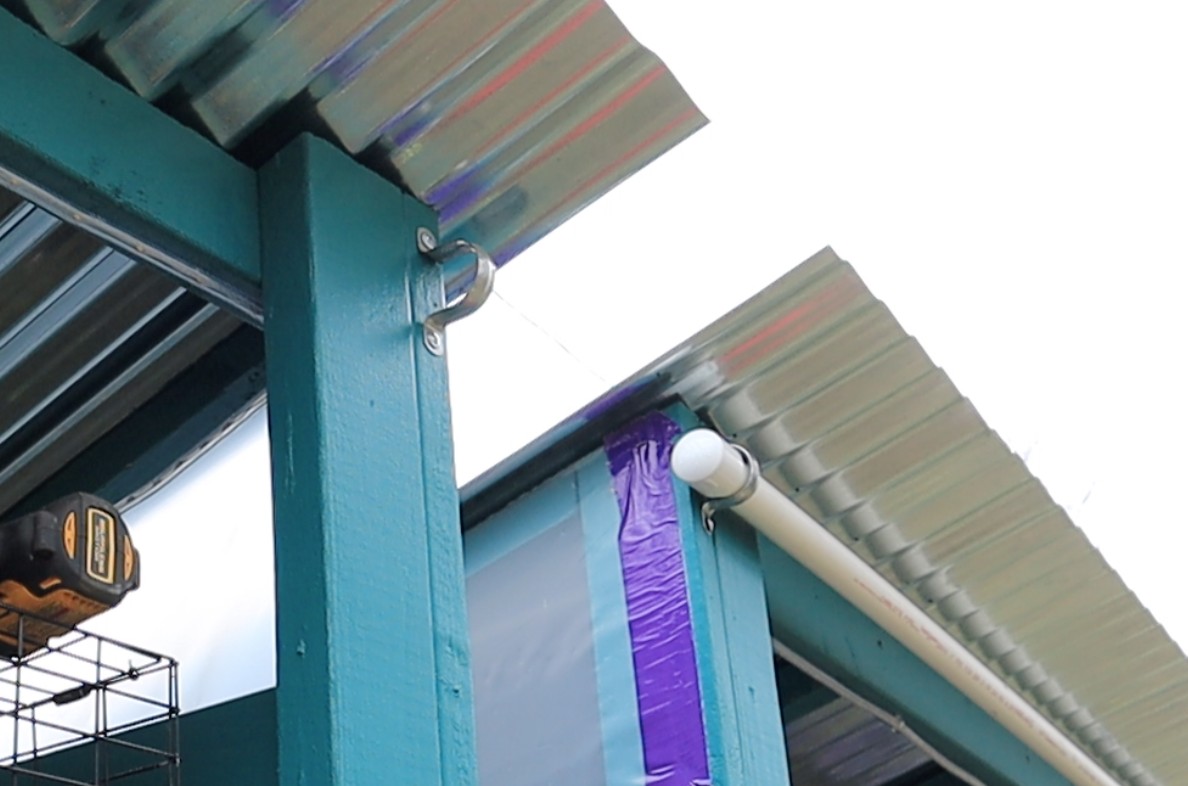
Step Five: Anchor the Drop Curtain Against the Hutch
Step Four ensured that the plastic would not blow around in the wind. This step ensures that even with heavy gusts of wind, the drop curtain will stay up against the hutch, keeping the rabbits away from windchill and wet weather.
Mark about 2” above every tube strap and screw in an eyelet into the hutch. Then, with the curtain rolled down, screw in an eyelet at the bottom directly below the ones you just screwed in at the top. Take your paracord or other weather-resistant rope and knot it at the top eyelet and over the drop curtain, all the way to the bottom. Knot it semi-tightly, but not so tight that you can’t roll the curtain up. And now, your drop-curtain will not be able to blow forward.


My Advice for When to Use the Curtain
If the weather allows for it, try not to leave the drop-curtain down 24/7. A lot of the time I tell people to “use their gut” when determining when to cover the rabbits. I drop my curtain on any night that is supposed to be below 30°F, or if there are high winds, or if we are supposed to get heavy precipitation. If we have a cold day but the sun is shining, I will raise the curtain so as not to cause a “greenhouse effect” within the hutch, which can actually cause rabbits to overheat. I like to raise it at any chance I get, because as I have repeated many times, good ventilation is key for healthy respiratory systems in rabbits.
The Really Cold Days
Now that your rabbits are out of the wind and snow, let’s talk about the really cold days. And for me, I consider “really cold” to be anything 20°F and below (your opinion may differ - this is just where that empathy comes in that I was talking about before). I don’t worry about the cold DAYS as much as I worry about the NIGHTS. So in order to compensate for those really cold nights, I like to give the rabbits a big handful of straw or hay to nest in. This will provide a warm, comfortable medium for nesting, as well as extra calories for energy to help the rabbits keep their body heat going.


Winterizing the Chickens
Chickens in Cold Weather
Just like rabbits, most chickens are made to withstand colder temperatures. Instead of fur however, they are equipped with soft downy feathers all over their bodies. Chickens bunch together for warmth within the coop and have an internal body temperature that averages 106°F. So again, the most important challenge we face when winterizing the chicken coop is to keep them draft-free and dry.
More Plastic Sheeting
If your coop has any areas where wind can potentially gust through, plastic sheeting and a staple gun is once again your friend. Wrap plastic tightly around the coop where necessary and staple it into place. This prohibits windchill from entering the chicken coop. No windchill = happy warm chickens.
Insulate Where Necessary
I didn’t insulate my coop when I built it, so there was one problem area that I saw, and that was where the metal roof attached to the top. When the chickens roost at night, they are particularly close to the open metal roof, and I was worried about freezing condensation. So I bought a cheap package of foam insulation at Lowe’s (CLICK HERE to see what I got) and attached it to the roof of my chicken coop using Great Stuff expanding foam insulation (CLICK HERE for that!) as my glue to hold it there (Note: Use Great Stuff VERY sparingly when using as a glue - also, spray it directly on the metal and then attach your foam insulation, not the other way around).
I also added a layer of foam insulation to the bottom of the nest boxes to keep eggs from freezing. The chickens haven’t started destroying it… YET, so I am hopeful :)
Deep Litter
When starting chickens this year, I decided to go with the deep litter method. Using this method, I have only cleaned my coop once twice year, and there is virtually no smell. So as for winterizing the floor in my chicken coop, I simply turned their “litter” a couple of times using a dust pan, and added more pine shavings on top (straw or thick pieces of hay work as well). This litter adds a layer of insulation to the bottom of my coop.
The Takeaway
As you’re winterizing and caring for your animals during the cold season, just keep the following goals in mind:
Reduce or eliminate windchill as much as possible.
Keep a dry environment for you animals.
Provide a constant supply of food for energy.
Provide animals with fresh water at least twice a day during freezing conditions.
Provide extra bedding on those really cold days.
Keeping livestock comfortable during the cold months of winter is part of the trade, so please make sure that you’re up to the task before taking on outdoor animals in a cold climate. The extra steps of winterizing will reap the rewards of healthy and happy animals all-year round. Remember, they are always depending on you!


I live in north-central Indiana in the country with my husband, our two dogs, and a lot of animals :) I love to craft and DIY and I’m obsessed with learning new things. I am driven by coffee and my love for animals. Learn more…